

Headless
The Headless tab is where you connect your shop to the outside world through Orderain's API. Open Settings from the dashboard sidebar and select the Headless tab to configure allowed origins and manage API tokens.
It's useful for two kinds of people:
- Merchants. Connect an AI assistant like Claude, ChatGPT, Grok, or Cursor to your shop with the MCP server, so you can manage products, orders, and even your store's design using plain language — no code required.
- Developers. Build a custom storefront on top of Orderain instead of the built-in one, powered by your shop's data through the API.
Allowed Origins
Add up to 3 allowed origins for your shop. These origins are the only ones allowed to make API requests to your shop.
- Enter an origin (for example
https://example.com) and click Add. A counter shows how many you've added (for example 1/3 origins added). - Remove an origin with the × next to it.
- Click Save Origins to apply your changes.
API Tokens
Create and manage API tokens to access your shop data programmatically. The View Documentation link opens the full API reference.
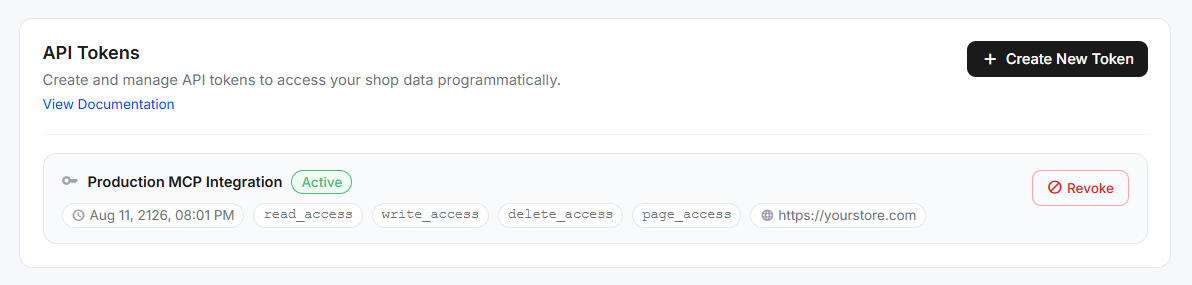
Before you create any tokens, this section shows an empty state — "No tokens yet — Create your first API token to start integrating with your shop." Once you add one, each token in the list shows:
- Name and a status badge — Active or Revoked.
- Created / Expires. The token's date and time.
- Scopes. The permissions granted, such as
read_access,write_access,delete_access, orpage_access. - Origins. The origin the token is tied to.
Creating a token
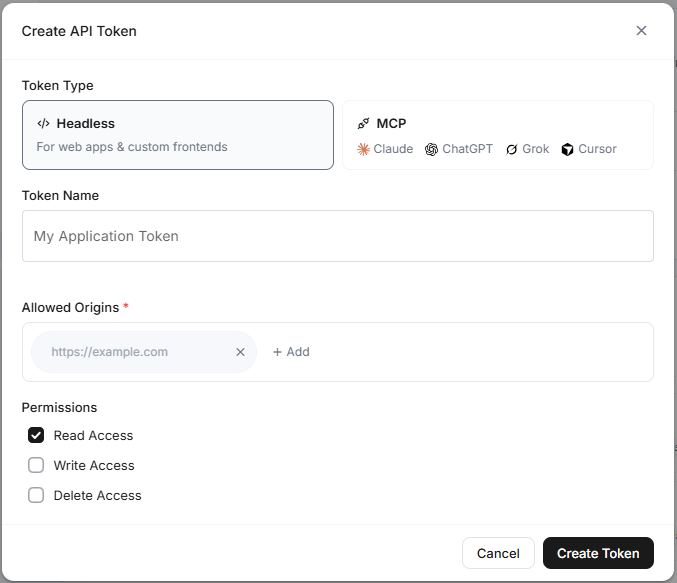
Click + Create New Token to open the Create API Token dialog. The first choice is the Token Type, and it changes which fields you see:
- Headless — for web apps & custom frontends that call the API directly.
- MCP — for connecting an AI assistant (Claude, ChatGPT, Grok, or Cursor) to your shop.
Then give the token a clear, professional Token Name that says what it's for (for example Production Storefront, Claude Assistant, or Analytics Integration), set its options below, and click Create Token.
For a Headless token:
- Allowed Origins (required). Your real domain, such as
https://yourstore.com. Type it and click + Add. - Permissions. Read Access, Write Access, and Delete Access.
For an MCP token:
- Permissions. Read Access, Write Access, Delete Access, and Page Editing (lets connected AI tools edit your website pages). MCP tokens don't ask for an allowed origin.
When it's created, a Token Created Successfully dialog appears. What it shows depends on the token type:
- MCP token. A ready-made MCP Connection URL with your token already in it (for Claude / ChatGPT / Grok / Cursor), plus your Token ID and Shop ID.
- Headless token. The full token value, plus your Token ID and Shop ID.
Use the copy icon to copy the URL or token — you won't be able to see it again — then click I've Saved My Token.
Revoking a token
Click Revoke on an active token to disable it immediately. A revoked token can no longer be used — any AI assistant or app connected with it stops working and can't read or change your shop anymore. Revoked tokens stay listed for reference but can't be reactivated; create a new token if you need access again.
Connect to AI assistants (MCP)
The Connect to AI assistants (MCP) panel lets you connect Claude, ChatGPT, Grok, or Cursor to your shop with the MCP server, so you can manage products, orders, and even your store's design in plain language.
It shows the MCP Server URL (https://mcp.orderain.com/mcp) and a tab with setup
steps for each app. To connect, create an MCP token above, copy its connection
URL, and paste it into your assistant's custom connector.
API documentation
For endpoints, authentication, and code samples, see the full Orderain Headless API documentation. The reference covers regions, product categories, products, inventory, shipping, taxes, cart, customers, orders, shop tags, and shop warehouse, and includes client libraries for Shell, Ruby, Node.js, PHP, and Python.
Shipping Rate
Set up shipping zones and rules so customers are charged the right delivery cost at checkout, from the Shipping Rate settings tab.
Orderain Magic
Manage your AI usage, track credit consumption, and buy more AI credits when your balance runs low, from the Orderain Magic page in Account Settings.